| Author | Message | ||
| lg71
Intermediate Member Username: lg71 Post Number: 135 Registered: 3-2006 |
I have been waiting for an answer for about a month now, I still don't know... Now it is urgent and important! - Would anyone know what bit size is needed to drill, for getting those inserts in properly (PUs and back plate/truss rod cover/PU selector inserts)? My bass is under the bench at the moment and the luthier is a bit nervous using those inserts, when he tried previously on my first Arialembic he split them and gave up, and reused the old ones. I want him to do it properly this time. I also noticed that those inserts are slotted, yet, when looking at them on Alembic basses, I cannot see the slot, so it looks like they are being screwed in "upside down" using a special tool. Anyone? Thanks, LG | ||
| mica
Moderator Username: mica Post Number: 3668 Registered: 6-2000 |
Hi Louis-Gino, Your question does not have a simple answer. I have not been available to produce a detailed tutorial, which it's apparent you will need in install the inserts correctly. Today I spoke with James, and he is going to coordinate with me for the next inserts he installs so that I can document and photograph the procedure. It's more than just drilling the right sized hole (although it's a good start). Today, he was not installing any inserts. Maybe tomorrow! | ||
| lg71
Intermediate Member Username: lg71 Post Number: 136 Registered: 3-2006 |
Hi Mica, Thanks, I understand perfectly. The thing is the luthier is put on "hold" at the moment, because I told him to wait until I get back to him with exact measurements. Believe me, he kinda "fears" this procedure. Meanwhile, he cannot really move on because of that. But that's fine, I much prefer to wait again, as opposed to have him start and not doing it properly. So, I'll call him again tomorrow and will tell him to wait a bit more before he starts on this. I have asked him to do all possible inserts points on the bass, PUs, truss rod, back plate... I am even thinking of doing the bridge, as it gets tarnished very quickly, and it would be nice to take if off without further damaging the threads on the wood. Anyway, I really look forward to some relevant details/explanations regarding this mysterious procedure. But as you said, drilling the right holes is a good start, and if I could have those dimensions before the more advanced part, at least he could start drilling, and I could put the inserts myself at later stage. I would have drilled myself, but I don't have a press. | ||
| mica
Moderator Username: mica Post Number: 3671 Registered: 6-2000 |
I'll include the drill sizes with the whole procedure - you and he should read the whole procedure first before you drill anything. It can avoid some unneccesary rework! We'll be documenting both the plate and the pickup inserts. | ||
| lg71
Intermediate Member Username: lg71 Post Number: 137 Registered: 3-2006 |
Thank you, I am definitely going to tell him all that, and count on me, I'll do the reading for him. He won't escape any of the right procedures this time! | ||
| 2400wattman
Advanced Member Username: 2400wattman Post Number: 247 Registered: 11-2005 |
Fantastic!, please fill me in as I need to do this same thing for my Series1. | ||
| lg71
Intermediate Member Username: lg71 Post Number: 141 Registered: 3-2006 |
Great, I am not the only "weirdo"  LOL LOL | ||
| 2400wattman
Advanced Member Username: 2400wattman Post Number: 248 Registered: 11-2005 |
Absolutely not! There's more of us than you realize. Whooooooooo! | ||
| lg71
Intermediate Member Username: lg71 Post Number: 144 Registered: 3-2006 |
Nice to hear that! AAAAAAAAAAAAAAAAAAAAAAAHHHHHHHHHHHHHH!!!!!!!!!!!!!! | ||
| mica
Moderator Username: mica Post Number: 3679 Registered: 6-2000 |
Check the FAQ for the installation instructions. Hope they help! | ||
| jack
Member Username: jack Post Number: 100 Registered: 11-2005 |
Cool tutorial. Well done. I love the big "prohibited" sign on the screwdriver in the last pic. | ||
| lg71
Intermediate Member Username: lg71 Post Number: 153 Registered: 3-2006 |
Mica, thank you so much I didn't expect to see what I saw, it's amazing what one can achieve with a combination of simplicity and being creative as well! I had a different idea, I thought you were using a special custom tool for that, I was far from it. I have spent some time designing a little tool for you, that's what I thought you were using. If you like it and find it useful, why not trying to make something similar. The drawing is a bit primitive, but I am sure you'll get the idea. Was wondering the size of the bit for the PUs inserts? Thanks, LG 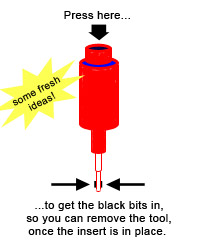 | ||
| mica
Moderator Username: mica Post Number: 3682 Registered: 6-2000 |
Well, we actually do use a different tool for the job, but most folks that are only going to modify a single instrument won't want to spend $90 on a tool for such a specific purpose. The sizes for the pickup inserts are included at the end of the post. Hope it helps. | ||
| lg71
Intermediate Member Username: lg71 Post Number: 154 Registered: 3-2006 |
Just a little addendum, if thought you could even use a more "passive" design, where you don't have to press at the top to get the bits in, the bits could use a spring system, so you could simply pull the tool, and they would retract by themselves, although the edges/corners of the bits would have to be rounded... Just some constructive thoughts... | ||
| lg71
Intermediate Member Username: lg71 Post Number: 155 Registered: 3-2006 |
I see, I just read you last post! Well, it's clear now ;) |