| Author | Message | ||
| edwardofhuncote
Senior Member Username: edwardofhuncote Post Number: 773 Registered: 6-2014 |
Some of you that have read my rambling posts know I spend a fair amount of my free time in a shop working on musical instruments, a hobby I picked up from my Dad thirty-some years ago. I put up this thread http://alembic.com/club/messages/449/210467.html?1435634821 one time about a few banjos we built together years ago. Occasionally we still collaborate on a project, though not as much in the past couple years. Busy� you know, life gets in the way. Anyway, opportunity recently presented my Dad with some time to work in the shop again, and that being the case, it�s time for another shop thread. The Project: an �Oriole� tenor banjo, made by Gibson in 1926. Like many other makers of the day, Gibson made musical instruments for sale through places other than their dealers, and simple re-branded them under various names� �Kalamazoo�, �Cromwell�, �Tru-Jo�, �Kel-Kroydon�, and �Recording King� to name a few more. �Oriole�, as I understand it, was a Montgomery-Ward catalogue brand. This particular model was essentially a re-badged TB-0, their basic tenor banjo offering, fairly plain, though still very good quality. Not many folks play tenor banjo anymore, but around the mountains of Southwest Virginia, if you shake any good-size tree, a half-dozen banjo players will tumble out� at least two of them will be very good players. The others� well, it�s best if you move them along before the neighbors notice, or worse, more banjo players suddenly get the idea it�s cool if they hang out at your place. Call the cops if you must, or just lure them offsite with a sausage biscuit or cheap beer. The sticking point here, there�s literally no difference between the pot assembly (the round, drum-like part) of a tenor banjo and a regular, long-scale five string banjo, but the necks as you can see are radically different. This project is a typical conversion, from four-string short scale to five-string long scale. Thousands of these been done on Gibson tenor banjos - so many in fact, it�s actually pretty hard to find a pre-WWII Gibson banjo with the original tenor neck. This project is a little weird, because this model was so plain that most would overlook it in search of the fancier higher-end models from the same era to convert. Starting with the neck: Here�s the original neck, and the roughed out new one. They are the same basic construction, with maple, and a rosewood fretboard. We�ve already installed a two-way truss rod, although we put it in backwards so the access is in the heel instead of the headstock. The original had no neck reinforcement by the way, though it probably didn�t need any, as tenor banjo strings are very light gauge. We�ve also glued the ebony headstock veneer on before sawing out the shape to a template made from the old headstock, and drilled the holes where the tuning pegs will go. (sorry, no pictures� hey, it�s just a few minutes with a bandsaw and drill press. I�m basically just trying not to cut off any bass-playing fingers or end up with some extra holes) 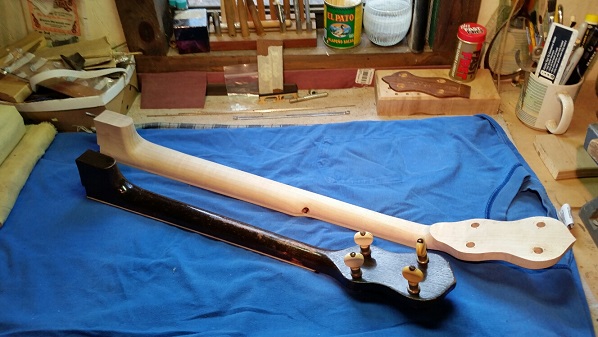 In keeping with the minimalist element, Gibson used a very plain headstock pattern on these models. Notice how the inlay on the old tenor neck�s headstock isn�t even inlaid pearl, but instead is stenciled or silk-screened in silver paint. Here they are from the same angle. 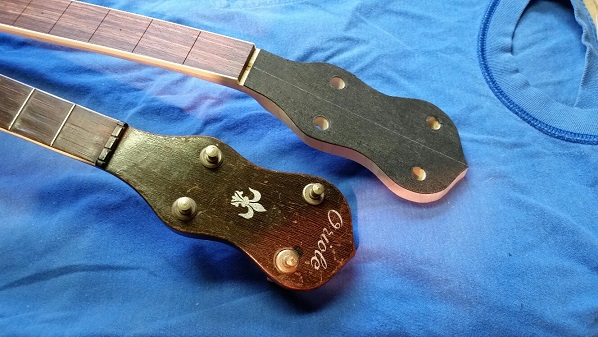 Using a high resolution digital picture, we were able to have the inlay machine-cut out of some .040 genuine mother-of-pearl. Here it is laying in position on the new headstock, and the old stenciled one for comparison. 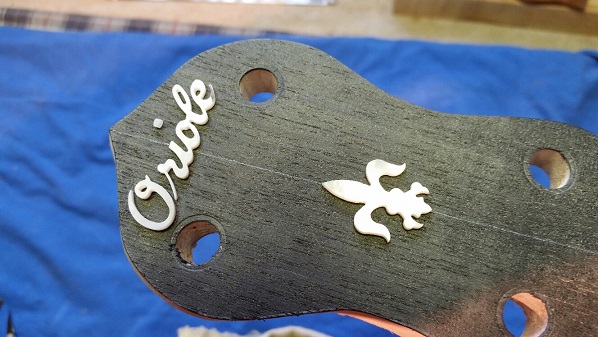 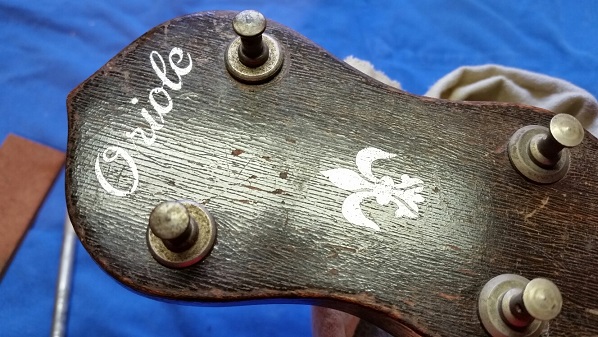 Next up, the pot assembly � most of which is already finished. | ||
| tncaveman
Advanced Member Username: tncaveman Post Number: 310 Registered: 2-2011 |
This is a good start Gregory. I might have to head to VA and make a cherry wood neck with you for my next build ;-) Stephen | ||
| edwardofhuncote
Senior Member Username: edwardofhuncote Post Number: 775 Registered: 6-2014 |
Cherry is a fine wood for banjo necks Caveman. =) Wasn't that what you used on the Tornado Tele? Seriously, I have a couple cherry neck billets already glued up for future builds. One of them is going to be a cello-banjo, a giant 14" diameter pot with a 4-string neck, and tuned to the same C-G-D-A as a cello. There's a maple five-string in the works as a companion to it. | ||
| tncaveman
Advanced Member Username: tncaveman Post Number: 311 Registered: 2-2011 |
The body was cherry and neck was premade flame maple/roasted birdeye by Musikraft. The building of a neck kind of scares me. Mostly because I don't have a real shop, experience, and tools to do it. I'd love to build an all cherry neckthru. I have enough wood. I recently got a plainer and have plained one side of all my thicker boards. I just need to start sorting and gluing up some body blanks. Because I have to do everything outside, I'll get back into it this spring. Stephen | ||
| elwoodblue
Senior Member Username: elwoodblue Post Number: 1794 Registered: 6-2002 |
Thanks for sharing Edward, Do you own the inlay machine or do you have it done somewhere? The neck looks great! I'll be watching for updates. | ||
| edwardofhuncote
Senior Member Username: edwardofhuncote Post Number: 776 Registered: 6-2014 |
We used to get Eric Sullivan at First Quality Music to cut pearl for us... not sure if they still do it or not. When Gibson Nashville ceased banjo production a couple years ago, it hit their business pretty hard. They were machining necks and resonators on a CNC. My Dad was really good friends with Jeff and Eric's father, Bill Sullivan. He was instrumental in helping us along as builders. | ||
| edwardofhuncote
Senior Member Username: edwardofhuncote Post Number: 777 Registered: 6-2014 |
The now rebuilt and upgraded pot assembly is complete. Wish I�d taken some before pictures so you could see what we did� it�s hard to visualize by just the finished job. We replaced all the hooks and nuts used to tension the head with readily available modern ones, but just cleaned up the old tension hoop and flange. The biggest alteration, -and this was a major upgrade- was the addition of a cast bell-bronze tone ring. Here�s the whole assembly on the bench. 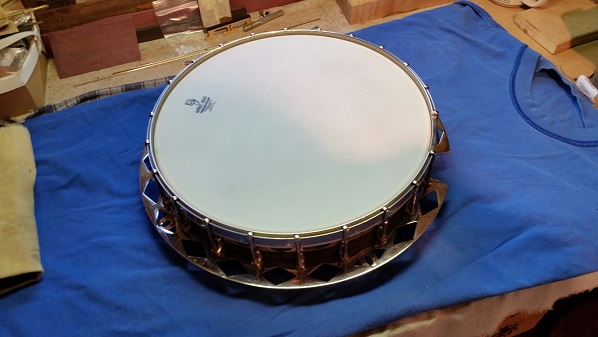 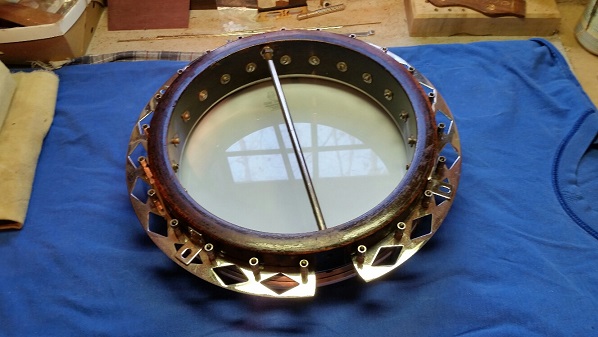 Notice this number stamped into the back of the wood shell� this is a Gibson factory order number which dates this banjo to 1926 production. It is in an odd place, as these FON�s are usually found on the inside wall.  If the space age electronics and pickups of an Alembic are at the heart their sound, the tone ring is the most important element of a banjo�s. Without getting too technical, it�s a metal hoop the drumhead is stretched over. The several pounds of added mass probably are the major influence, but this is literally a bell that�s machine-fit to a �� thick wooden hoop, producing a resonant chamber that can be tuned. (insert obligatory joke about tuning a banjo here) Again, by virtue of it�s place in the line, this Oriole banjo came with a simple �� brass hoop for a tone ring, rather than the much more substantial solid cast bell-bronze rings found on Gibson�s �Mastertone� line. (I borrowed these 2 images from the net to illustrate the difference) Here�s what the original one looked like, and the one to be installed. 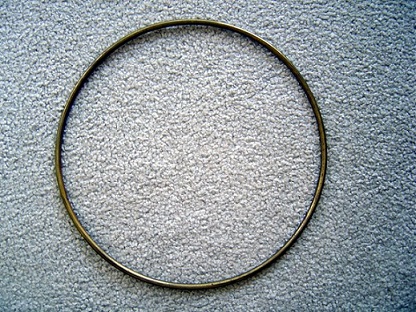 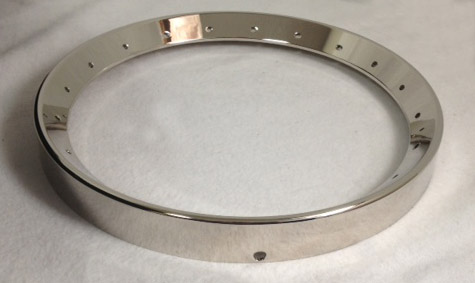 Here it is (actual) installed on the Oriole, as seen from outside and inside. It�s quite a chunk of nickel-plated brass! 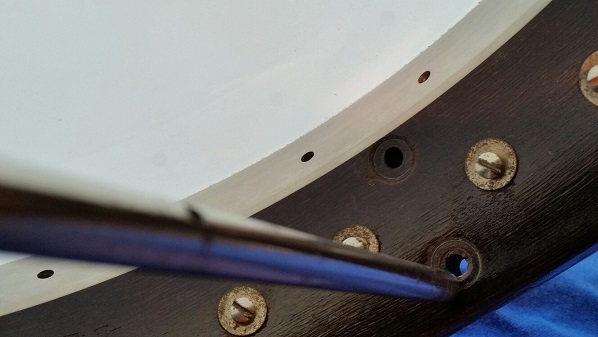 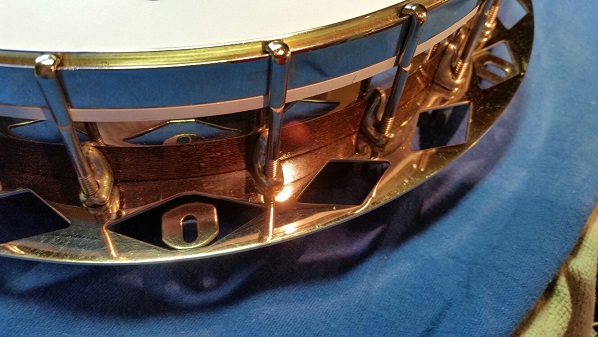 Replicating the �flathead� tone rings of those pre-WW2 Gibson banjos is at the core of practically every banjo-maker�s business. Unquestionably, the most successful maker in recent years is a guy named Steve Huber, who�s shop is located in Hendersonville, Tennessee. (just north of Nashville) Steve perfected the metallurgy, and combined that with some topnotch luthiery to produce a professional grade instrument. Here�s Steve�s website: http://huberbanjos.com/ Although he hasn�t been in business building for quite as long as our hosts, he most definitely strives for the same level of perfection in his instruments. Very small shop with just a couple folks, but absolutely the top of the game. Well, just to fill in the story, Dad and I know Steve a little bit, and that's why we sent the Oriole�s pot assembly to him to do this retrofit of one of his vintage reproduction tone-rings onto. The machine-work as you can see, is perfectly seamless. It looks like this banjo came with that super high-quality ring doesn't it? Next up: Inlay and Fretting. | ||
| edwardofhuncote
Senior Member Username: edwardofhuncote Post Number: 827 Registered: 6-2014 |
Dad finally had a little more time to whittle this week, and came over to hang out in the shop. We did the inlay last night, and are going to hammer some frets in tonight. I use slow-set black-tinted epoxy to set the inlay, so it'll be ready for sanding flush tonight. I'm a little out-of-practice on inlay work, and I need new glasses with bi-focal lenses too. Here's a action shot teaser Dad took while I was routing the headstock. 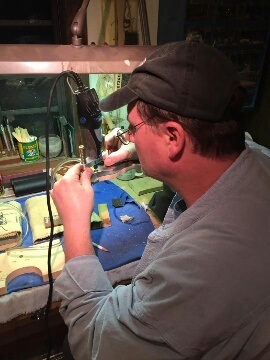 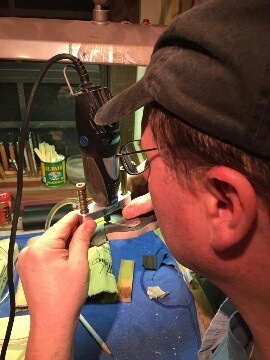 Just realized how badly I need a haircut. But hey, it's seriously Winter here... it'll keep another couple weeks, or at least until the single-digit forecast is rescinded. =) | ||
| edwardofhuncote
Senior Member Username: edwardofhuncote Post Number: 828 Registered: 6-2014 |
Dad started on the fretwork last night. These frets overlap the binding, which adds an extra step... the tang (barbed part that bites into the wood) has to be nipped and filed before the fret is hammered in. One of those "Old Indian Tricks" I got from him a long time ago, when doing a complete re-fret, always start at the heel end. That way if you get a little happy with the file and one comes out too short, you can just move it up to a shorter fret slot further up the taper. This banjo has 21 frets, and he's filing of the end off fret #20 fret here. (in other words - long way to go)  | ||
| edwardofhuncote
Senior Member Username: edwardofhuncote Post Number: 858 Registered: 6-2014 |
Haven�t updated in a while, but work on the Oriole tenor-to-five conversion is galloping along. Here's how the inlay in the headstock turned out: 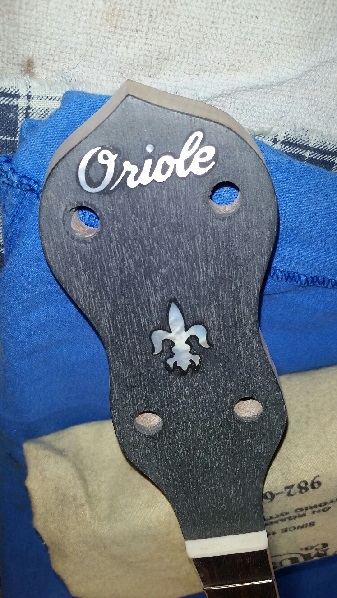 And while you're there, here's the bone nut: 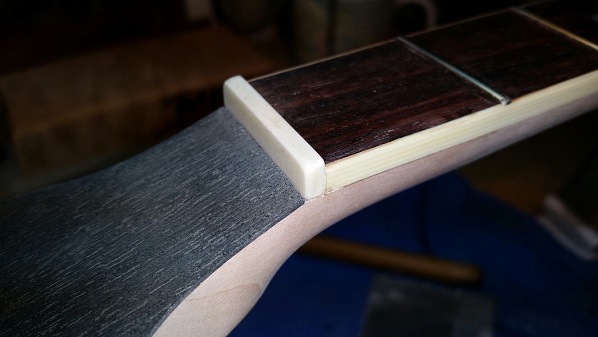 Dad came over one night last week, and spent the evening installing the frets. He didn�t like the way they were hammering in, so he routed the fret slots a touch deeper, and glued the frets in a few at a time. Duco cement is a wonderful thing� just don�t inhale it. Here's all 22. 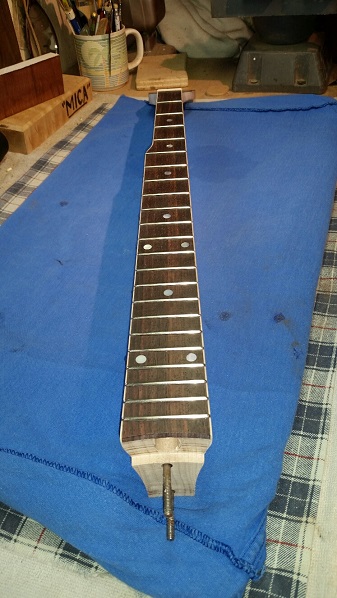 Since this neck is bound, each fret end had to have the tang nipped and filed, so the fret can overlap the binding. Not necessary, but looks sharp when you take a little extra time. After the glue set, I dressed all 22 of them so they�d be perfectly level, then re-crowned them. After that, I use a 3-corner file with one bur ground off, to round over the fret ends to a bullet shape, then polish each fret. See the difference? 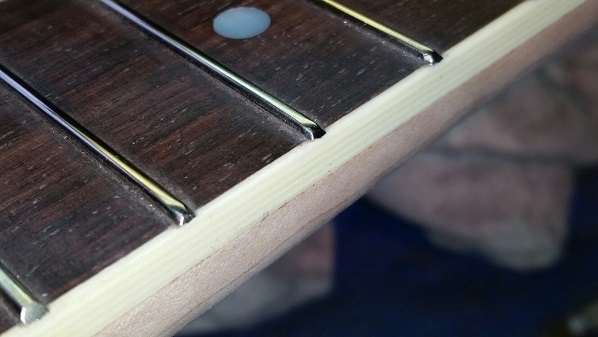 Sidedots anyone? Hey, they ain�t LED�s, but we are talking about banjo players here! Seriously, I just use a small drill bit and fill the holes with colored epoxy, file and sand flush and� boom. 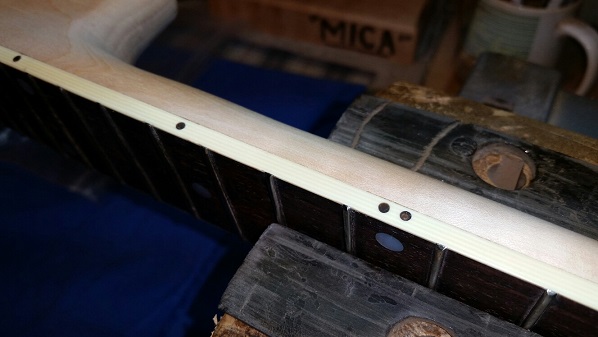 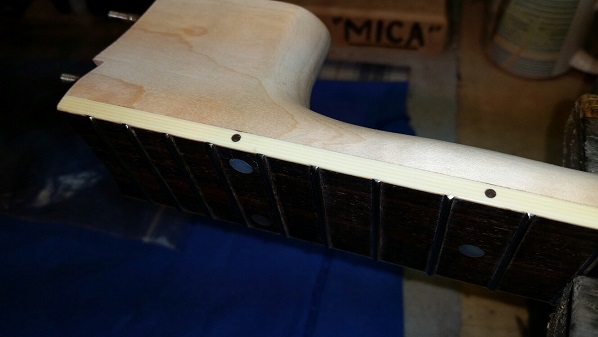 Almost time for some finish� I�ve done all the finish sanding, and �raised the grain� twice. This is where you wet the wood, causing the grain to swell, then sand it smooth again. Makes for a very smooth surface to apply finish, especially with maple. Since this neck is going to be stained a chestnut brown, I have masked up the binding for the airbrushing process. It�s an alcohol-based stain, that will bleed if you�re not careful. 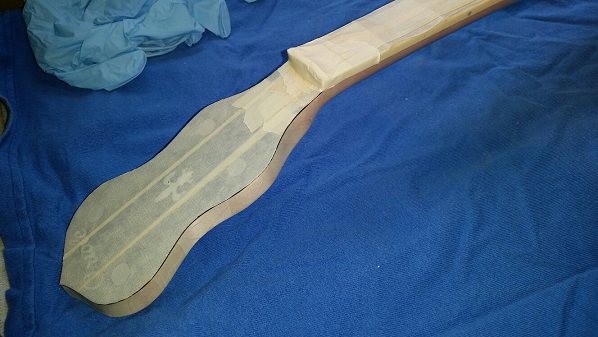 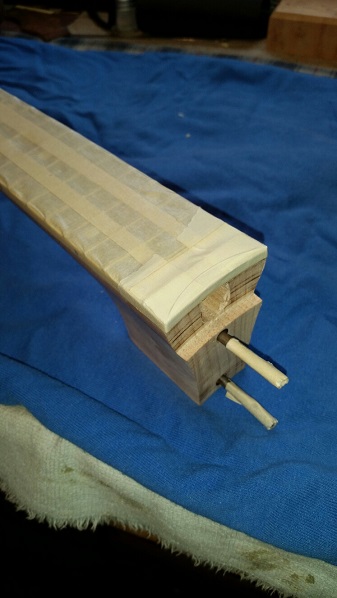 Here�s the resonator that I�m trying to match color to� I always use a block of same-same wood to test my colors with, even some clear finish so the true color is analyzed. Colors distort in different light, so it�s important to look at the match from as many angles as possible. Natural sunlight is best, but a good ol� incandescent work lamp suits me fine. 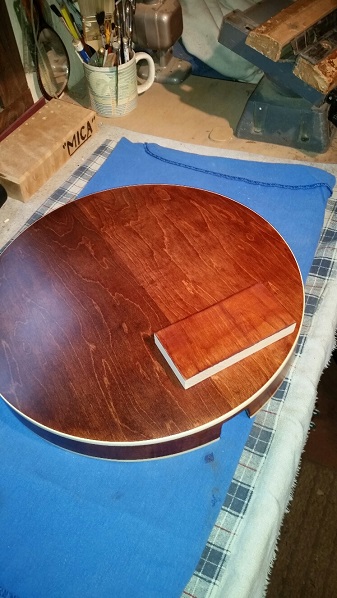 Next up, we�ll peel the tape off the binding and headstock, and start spraying lacquer. Yeah� umm� don�t breathe that stuff either. | ||
| ed_zeppelin
Advanced Member Username: ed_zeppelin Post Number: 266 Registered: 2-2010 |
Are you going to use model railroad spikes? If so, please include pics. I think people will get a kick out of such a novel solution. | ||
| edwardofhuncote
Senior Member Username: edwardofhuncote Post Number: 859 Registered: 6-2014 |
Oh yeah, gotta' have spikes. Those sliding fifth-string capos are worse than a tangle of clothes-hangers. =) Dad's very particular about how they're installed though, and usually does that last-thing, after final assembly and setup. Pictures of the finish coming tomorrow. Color match with the resonator is darn-near perfect. I think the color *is* spot-on, just that the neck has more figuring than the resonator does, which kinda' throws perception off. I'm still spraying washcoats of clear, twice daily... might be done tomorrow. Will let it cure for a day, wet-sand, then decide if it needs another coat. | ||
| ed_zeppelin
Advanced Member Username: ed_zeppelin Post Number: 267 Registered: 2-2010 |
I'm going to be honest here, just for the sheer novelty of it. I don't remember where this idea came from, but it's worked out just spiffy. It might have been Pete Seeger, because I worked my way studiously through his book before deciding I wasn't a banjo player. It's worth noting that I started on Earl's book when I was about 8, long before realizing I wasn't a banjo player, but I can still do a passable Foggy Mountain breakdown at knifepoint. But I like Earl's Breakdown better (it's harder to teach to guitarists, though.) Our plan view is looking at the banjo as it sits in a stand, okay? Just so's we start on the same vector. I'll refer to the 5th string side as "port" (and you're the only person here who knows why) and the bridge as "aft." Oh my God, I'm getting my Cletus on. You only use two spikes. One for the A at the 7th fret, with the tang pointed aport. The other at the 9th fret, with tang pointed to starboard. The advantage is that you can "catch" three keys, on the fly, with one finger. First the A, by pushing the G string aport like usual. The second is the B, by bending the string to starboard. By using both, you can set the distance between the spikes to raise it to a C. The high D is redundant ("the dusty end of the fingerboard," Chet called it) and nobody plays up there unless they're trying to show off anyway. A banjo player showing off. Imagine that. That might be out of Earl's book, come to think of it. The whole middle part was about making a banjo. (And why I love working on banjos to this day.) When you were talking about rebuilding the tone ring assembly I was right there with you. Stuff fascinates me. That two-spike thing might be as common as dirt. I don't know. All I know is that I didn't think of it because it's genius, and I've openly admitting to being too dumb to be a banjo player. You figure it out. | ||
| growlypants
Intermediate Member Username: growlypants Post Number: 161 Registered: 3-2011 |
inGENious!! (That's why I love this board. There's so much to learn!) | ||
| edwardofhuncote
Senior Member Username: edwardofhuncote Post Number: 862 Registered: 6-2014 |
 That's the one Forest. Yep, my Pops drew his original inspiration to build a five-string banjo from Earl's book. Guess I was maybe 8 or 10 years old. Dad could (and still can) build about anything he can dream up... to this day he designs concrete and steel structure for conveyor systems, then oversees it being built. And right-on about the spikes too... every other one is turned opposite. Dad is also very particular about how close to the fret it's seated, and alignment so that it's positioned precisely under the fifth string. Both of these affect tuning in a huge way. I'll catch some pictures detailing that when the time comes. Pictures of color match and finishing process coming this afternoon or tomorrow. (or whenever I have time to resize them) I've been out of the office for a week, and now it looks like somebody turned a bunch of monkeys loose in here... will be sorting things out for a while. | ||
| ed_zeppelin
Advanced Member Username: ed_zeppelin Post Number: 269 Registered: 2-2010 |
Here's the world famous chromatic adjustable 5th string capo: Just thirty five dollars, write me for details. (It comes with a free pen!) | ||
| edwardofhuncote
Senior Member Username: edwardofhuncote Post Number: 863 Registered: 6-2014 |
We have color folks... here's the stained neck, posed next to the resonator it will be mated with. No real gloss yet, just one thin coat to seal in the color to the wood. 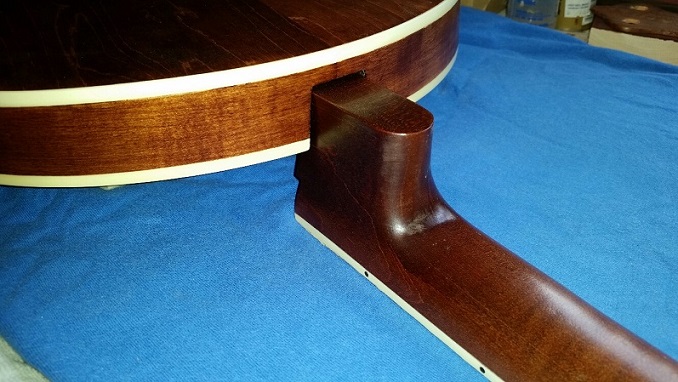 More dramatic shots tomorrow... | ||
| edwardofhuncote
Senior Member Username: edwardofhuncote Post Number: 865 Registered: 6-2014 |
After a couple wash coats of Deft "Clear Gloss", it's starting to take on some shine... 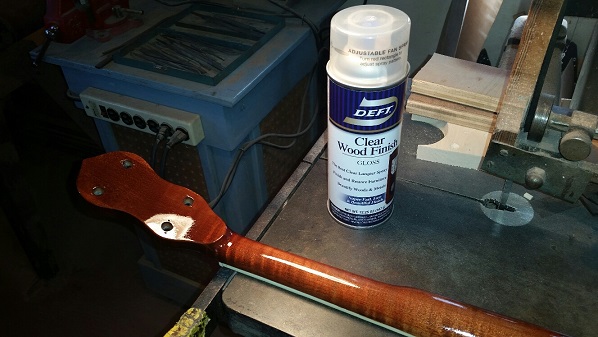 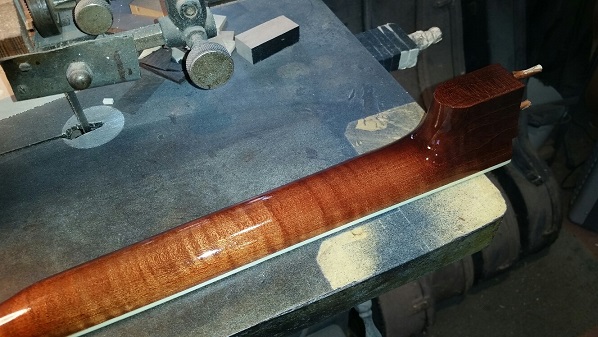 You can see how the color changes in natural sunlight... it occurs to me, this is about the same color I like my morning coffee to turn out. 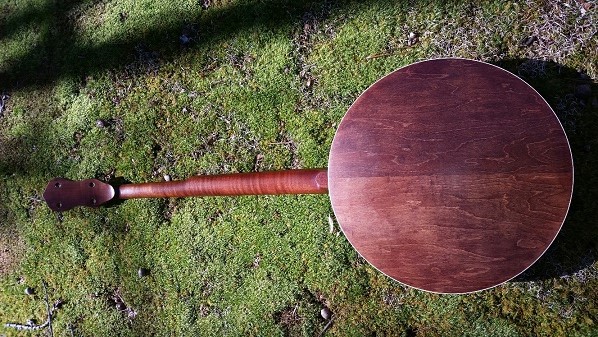 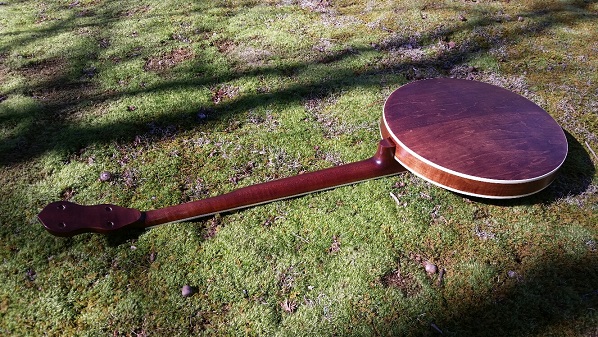 Keep in mind, the resonator (round part) is already finished, but has not been buffed out yet. We'll get to that later... I sprayed the final coats of Deft on the neck last night and peeled the tape. We'll let it cure for a couple days, then final assembly - probably this weekend. | ||
| edwardofhuncote
Senior Member Username: edwardofhuncote Post Number: 872 Registered: 6-2014 |
Winding down to the end now� After final wet-sanding and rub-out late Friday night, Dad came over Saturday morning for final assembly of the Oriole. First, the tuners had to be mounted on the now finished headstock. They�ve already been fitted prior to the finishing process, so the wood is already compressed where they will go. These are vintage reproduction pegs, made to closely resemble the Grover �pancake� pegs of the day. The nice thing about assembling (or disassembling) a banjo � a couple wrenches is all it takes. All the critical fitting has already happened, so all there is to do now is put all the pieces together. Very much like a standard Fender bass in that regard. One thing Dad is a stickler for in assembling a banjo � never-never-never-ever put one in a bind by over-tightening the co-ordinating rods that secure the neck to the shell. Some folks will use these to lower or raise the string action by compressing the wood shell. That�s not how that�s done, and it will eventually warp and potentially ruin a shell. Anyway, here�s some sparklies� 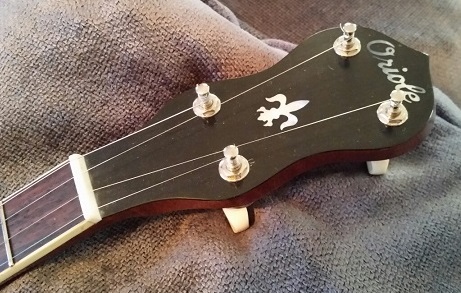 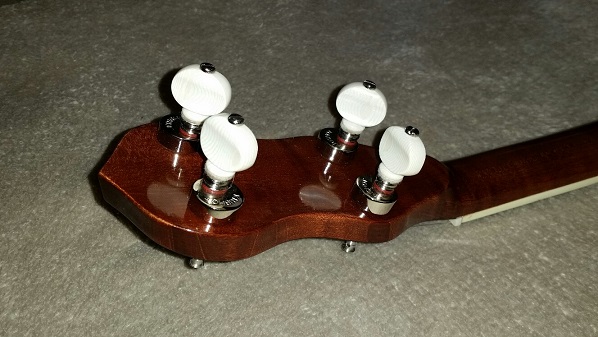 Here�s Dad installing the railroad spikes Forest mentioned a couple days ago. They really are model railroad spikes, but they make a fantastic fifth string capo. See, the top string (called a chanter sometimes) on a banjo only goes to the fifth fret, so when you capo to the second fret, the fifth string has to be capo�d two frets up as well. There are a few ways to do this, but this way is generally preferred. Trick is to drill a tiny pilot hole first, then press the spike in with a (also tiny) pair of pliers. We also will put a drop of CA glue on the spike to bind it in place. Once pressed in, we use a 0.013 feeler gauge and gently seat the spike to proper clearance. Why 0.013 - well, a regular fifth string is 0.009 � 0.012� it�s also important the top of the spike not be higher than the crown of the frets it�s between. (hint � sitar effect not considered cool in banjo circles... for whatever that's worth) You can see here, I�ve filed off the top of each one, and smoothed with 600-grit sandpaper, as sharp edges here would be extraordinarily bad. 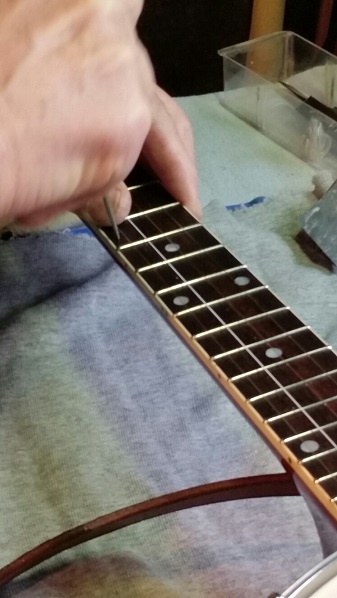 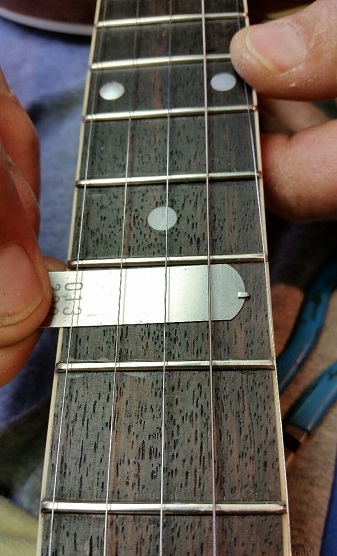 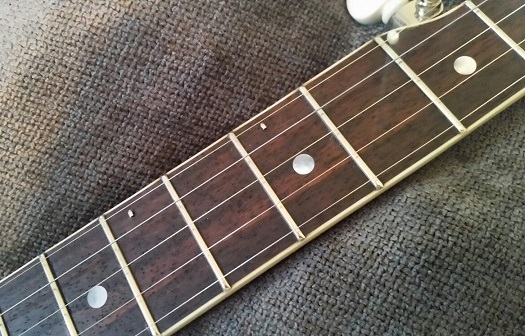 Almost done here� Though the nut slots are roughed in, I like to cut them to final depth during final setup. The bridge on a banjo is �floating�, so setting the intonation is as simple as sliding it fore and aft until it intonates. Dad uses the 12th fret harmonic to get close, and the 19th fret harmonic for accuracy. He uses only one string, since a banjo�s standard tuning is an open G, producing a bunch of sympathetic tones, it�ll drive you crazy trying to hear just the ones you need. So skipping ahead, Dad brought a new leather strap � he�s fastening it to the bracket hooks for proper length here. 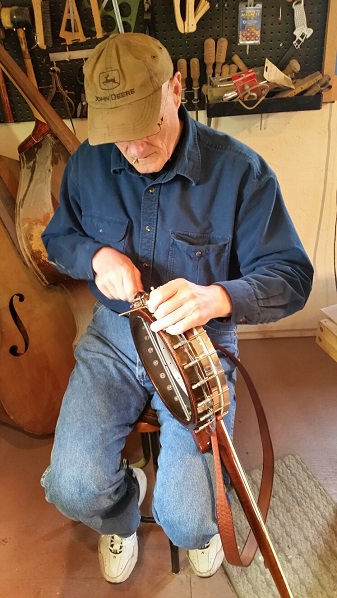 Then� it's finally time to PLAY IT! 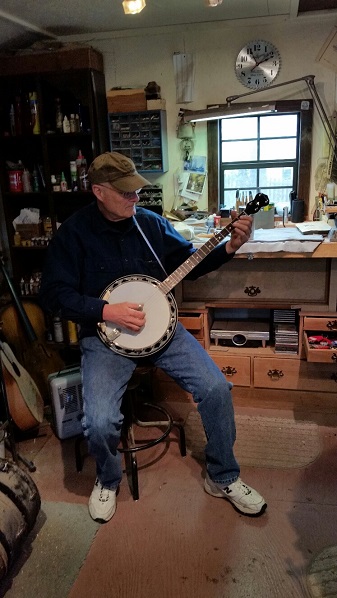 A few more small adjustments and we�re calling this one - DONE Here�s a couple more finished pictures on the sofa. Notice the rest of the hardware� that armrest is the period-correct real-deal, straight from a junk drawer full of old Gibson parts. The tailpiece however, is a Waverly, an exact reproduction of the original except made for a five-string. (remember, this was a four-string) Dad�s tooled leather strap looks good against that coffee color, and the old nickel hardware polished up nicely. 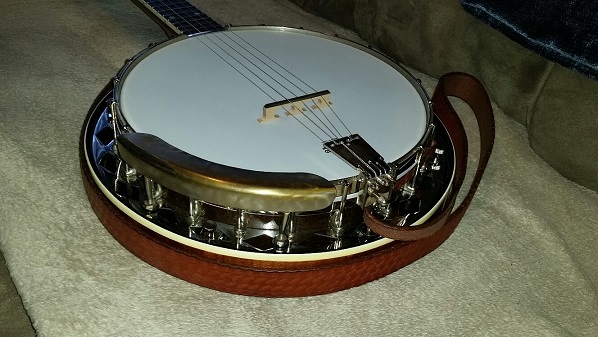 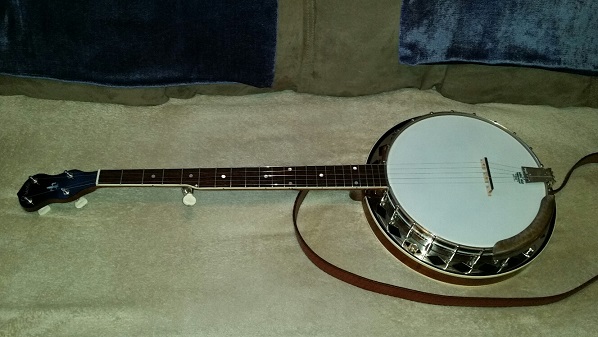 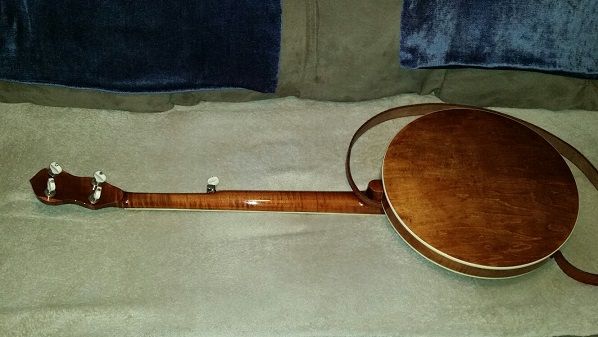 That�s about it for this one. Not sure what we�ll tackle next� there�s quite a backlog, plus my basket-case upright bass repair is way behind too. | ||
| growlypants
Intermediate Member Username: growlypants Post Number: 163 Registered: 3-2011 |
Fan-freaking-tastic!! (Hey, I used to be in the Navy, so...) I very much enjoy reading and seeing how true pros do truly excellent work. Thanks for the post. Unreal. | ||
| peoplechipper
Senior Member Username: peoplechipper Post Number: 661 Registered: 2-2009 |
I love the spike/capo thing; never seen this before ( I don't play banjo ) but I love it...and really nice work too...Tony | ||
| ed_zeppelin
Advanced Member Username: ed_zeppelin Post Number: 304 Registered: 2-2010 |
Slight difference with what I described about the spike thing, Greg. I blame the school system, and I think you know what I mean.  In the version I'm talking about, the first spike is pointed north. The second one is pointed south. You can hook the first one (A) by pushing up. You hook the second one (B) by pulling down. Here's the difference: if you do both, it raises the pitch to a C (it's like one-finger gymnastics for banjoists). Foller me? That could have been from Earl's book (like the "exacto knife thumbpick trick" that'll keep that sucker tight on your thumb all night) or Pete Seeger's book, or maybe the Bill Keith or Tony Trishka videos, I don't know. Somewhere back there before I realized I was too damn dum to play the banjer, that spike thing took root. That said, it may be that your Pappy's version works the same way, which means I'm thinking like a married man again and being all clever with it for no good reason whatsoever. (They can smell fear, y'know.)  |