| Author | Message | ||
| terryc
Senior Member Username: terryc Post Number: 1388 Registered: 11-2004 |
I am thinking of changing the knobs on my MK, the gold with red abalone look very nice..they would go well with the red LED's http://www.bill-lewington.com/qparts/dome.htm terry c | ||
| jacko
Senior Member Username: jacko Post Number: 2764 Registered: 10-2002 |
They'd look pretty cool Terry but I'm not sure if they'd fit depending which knobs you currently have. i have the 'collet' style knobs and i think the pots don't have a flat on the stem so fastening these knobs might be a problem. Check the stem diameter too. If you do go for them, let us know how you get on as they would look pretty special at a fraction of the cost of the THG knobs that are popular on here. Graeme | ||
| jacko
Senior Member Username: jacko Post Number: 2765 Registered: 10-2002 |
just been doing a search and Alembic's shaft diameter is 1/4" so lewington's should fit at 6mm. The only thing holding up my order now is deciding whether or not the grub screw will grip tightly enough without needing to file a flat onto the pot shaft. Graeme | ||
| jacko
Senior Member Username: jacko Post Number: 2766 Registered: 10-2002 |
I just noticed they also do some pretty cool looking straplocks. A guy could get carried away spending money at Bill's shop. Graeme | ||
| bassilisk
Member Username: bassilisk Post Number: 83 Registered: 4-2009 |
I really like the Q-Parts stuff and have it on several basses. I recently had a Warmoth done and put on the UFO's with Red Abalone to go along with the CAR finish. Very sharp IMO. 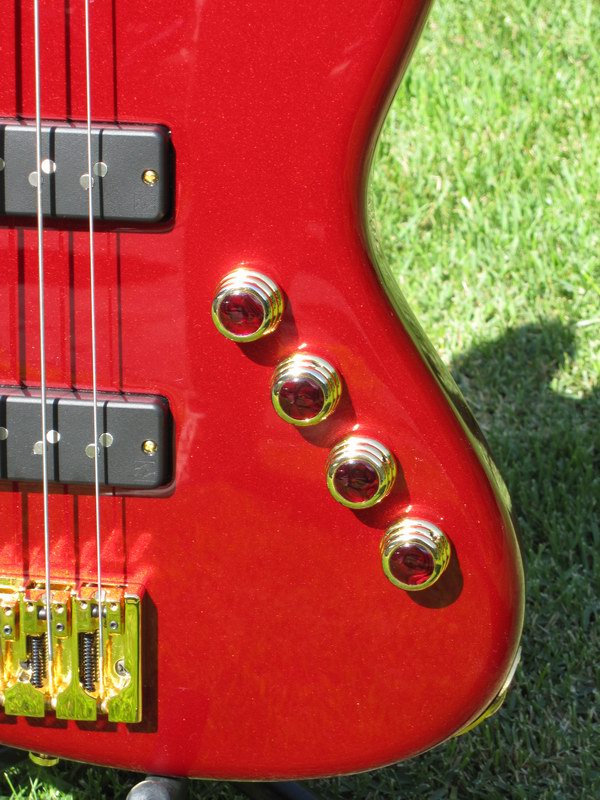 | ||
| terryc
Senior Member Username: terryc Post Number: 1389 Registered: 11-2004 |
bassilisk..they are really cool, compliments the red finish with the gold bridge. | ||
| bassilisk
Member Username: bassilisk Post Number: 84 Registered: 4-2009 |
Thanks! I've always wanted a Candy Apple Red bass, and finally I went for it. Matching headstock, gold Hipshot vintage tuners (and bridge), ebony board with blocks and vintage tint in the neck finish. It's passive with V/T for eack pickup. I must say the Nordy Big Singles totally rock! Here's a full shot. It's not an Alembic, but it kicks major butt in its own way. | ||
| jacko
Senior Member Username: jacko Post Number: 2772 Registered: 10-2002 |
i love candy apple red. So much so in fact, that I've just started painting my MG that colour... 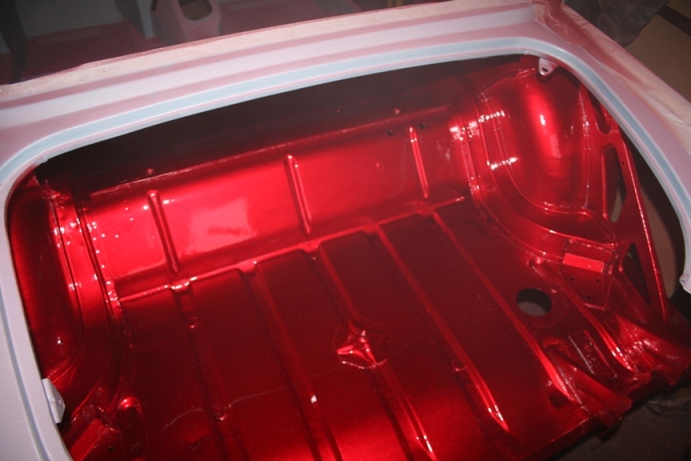 it's still a long way from being finished but at least I've finished all the welding now. Once I've painted it, if there's any paint left I may just paint my old precision, yours looks great. graeme | ||
| terryc
Senior Member Username: terryc Post Number: 1390 Registered: 11-2004 |
jacko nice spray job..looks like it has some fine metallic powder in the paint to give it that sheen. Did you use an airless gun or standard compressor and pot?? Oh yes I have e mailed the supplier of the control knobs as the page didn't have an order page. Will keep you all updated | ||
| jacko
Senior Member Username: jacko Post Number: 2774 Registered: 10-2002 |
There's 13 coats on there Terry. 2 coats of POR15 epoxy sealer, 2 coats of etch primer, 3 coats of metallic silver base, 3 coats of candy red and 3 coats of Clearcoat. I wanted to paint inside the inner wings and inside the rear arches before I welded the back panels on as they're inaccessible afterwards. I figured I may as well do the boot and parcel shelf while I was busy. I'm using a compressor and paint gun (standard Clarke suction cup type) but I'll be getting a better HVLP spraygun in the spring when I get round to painting the car proper. It's getting too cold and damp to paint now - I don't want any moisture getting under the paint as it'll just start rusting again. graeme. | ||
| terryc
Senior Member Username: terryc Post Number: 1391 Registered: 11-2004 |
jacko..machinemart stuff is really good for the price..I had an old Ingersoll-Rand compressor but I had rebuilt the motor that many times and the tank began to leak due to internal corrosion that it had to go..it served me well for many a year. I got a compressor from MachineMart for a mere �150, no leaks, no worries of burn out as it has an electronic cut out. Got the kit with all the tyre inflator, air nozzle, paraffin gun and basic pot as well. Not many DIYer's would make an outlay for one but they are very handy for many things, blowing up airbeds to spraying. Who was your paint supplier??, I have a Squier bass with Alembic Activators, the neck is okay but my son has beat up the body so I am thinking of re finishing. Again it looks a fantastic job you did | ||
| cozmik_cowboy
Senior Member Username: cozmik_cowboy Post Number: 811 Registered: 10-2006 |
I look Graeme's picture and I think of the other current thread with the f-hole Alembic w/finished p-heart on the inside. If that's how you paint the trunk (sorry, boot) I can't wait to see the whole car done! Very nice (I used to have a Spitfire & always thought it should be candy-apple red, but never did it). Peter | ||
| jacko
Senior Member Username: jacko Post Number: 2775 Registered: 10-2002 |
Terry. I'm also using a small Machine Mart compressor - an airmaster Tiger - and it's perfect for my needs - runs out of steam a bit when I'm using an air wrench but it's fine for painting - set between 3 -4 bar for most paints but with the HVLP gun I can reduce the pressure so there's less waste. I bought the epoxy sealer and etch primer from Frost and the candy from specialist paints. I initially got the 1 litre kit to see how it worked and what coverage would be like. I'll probably buy the 5 litre kit in spring to get the discount as there's still plenty to paint. peter - It'll be spring before I do anymore painting - I only have a small garage and it's not heated so the cold and damp take over at this time of year (especially in Scotland). back on track. I think I'll be ordering the brass knobs with natural abalone to match my neck inlays. Might just ask the wife for an early Christmas pressy ;-) Graeme | ||
| bassilisk
Member Username: bassilisk Post Number: 85 Registered: 4-2009 |
That's also a sharp look. I have the same setup on another Warmoth. 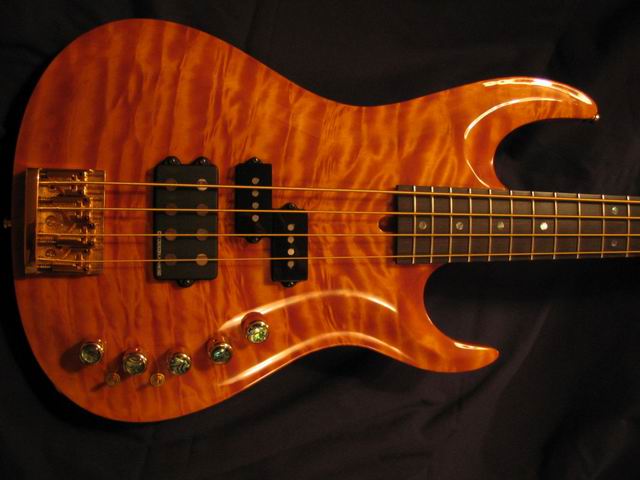 Nice job on the car. I'd love to see the completed project! | ||
| jacko
Senior Member Username: jacko Post Number: 2778 Registered: 10-2002 |
I was thinking about these knobs last night while I was practicing and came up with a potential problem - they don't appear to have a marker of any sort so knowing the exact position of the knob is going to be tricky. I don't want to be looking down at the Grub screw so what do folks think of drilling a 1/32 hole on the edge of the knob (in the brass) then filling that with white enamel paint (or somesuch)? Graeme p.s. those abalone knobs really are nice will. | ||
| jacko
Senior Member Username: jacko Post Number: 2779 Registered: 10-2002 |
Another consideration might be how far up the body of the knob the grub screw is. I took one of the knobs off my epic to check sizes and the shaft isn't very long - probably not much more than 1/4 inch. Graeme | ||
| terryc
Senior Member Username: terryc Post Number: 1392 Registered: 11-2004 |
jacko..use your ears!!! | ||
| jacko
Senior Member Username: jacko Post Number: 2781 Registered: 10-2002 |
Hah! that's ok if you have time to noodle. I have a few different settings that I use during a gig and having markers means I can go to a specific point very quickly. | ||
| bassilisk
Member Username: bassilisk Post Number: 86 Registered: 4-2009 |
Graeme - you can see the set screw location on the knob second from right. If you can see a 1/32" hole in a possibly dim light situation then go for it. (I know I couldn't - I can't see 1/16" brass dots on the side of a fingerboard!) There isn't much of a collar left on the top of these knobs though so you'd need to be careful. I don't do very much adjusting "on the fly", but if I did I would need to consider something more substantial and high contrast like a notch of some kind. Or LED's....LOL! As it is a lot of my basses have 1/4" stick-on dots on the side of the neck, including the 2 Alembics that don't have LED's. Will |