| Author | Message | ||
| mica
Moderator Username: mica Post Number: 3293 Registered: 6-2000 |
So Chip sketched in a "little point" on the back laminate. Here's what he came up with: 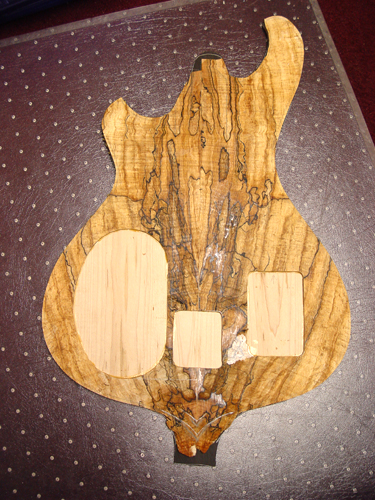 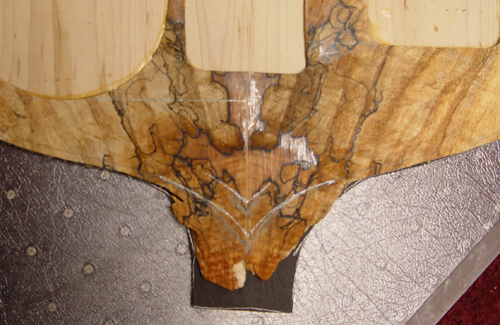 The inside line is about where the roundover will start. The outside line is the cut line. To keep that whole area that looks like a point in the grain, the point will have to get a little longer than the suggested "Valentino point" you were basing the idea on.  Let me know if you want to: 1. have a longer point and capture that whole shape 2. use the smaller point shown here 3. make it yet smaller | ||
| crgaston
Advanced Member Username: crgaston Post Number: 202 Registered: 11-2005 |
Mica, I'm a little confused because I'm seeing 2 sets of lines, both white and grey. If we start from the top, there is white grey white grey I assume you mean thet the white lines go together as roundover and cut lines, and that the grey ones do, too. If we start the roundover at the first white line, will the grain still retain the point shape in the roundover, or will it separate? Or is that a mystery until it's done??? Is the grey line the standard point shape, or is it still reduced somewhat? I think I would like it as small as possible while retaining the natural point in the grain. However, I really like the lines of the "Valentino point." I am thinking we go for the white, and if the grain separates visually in the roundover, we can make it smaller. Any input from anyone is welcome. Call me or email if you need to... Thanks, Charles | ||
| mica
Moderator Username: mica Post Number: 3322 Registered: 6-2000 |
Right now, Peter is working on the carving for your bass. Here's a detailed sketch he's prepared to show what we have, and what we can do: 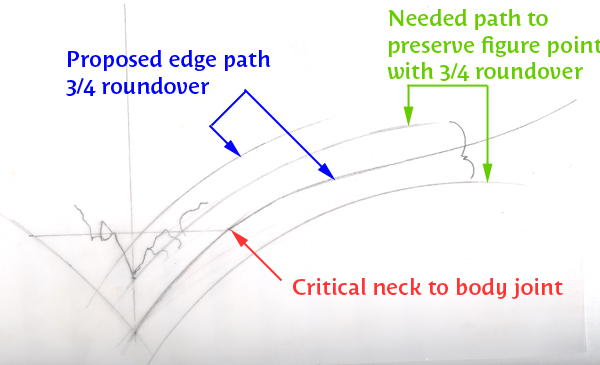 The red arrow indicates a critical point where the neck meets the body, the point carving must pass throungh this point or to the outside of it. The blue arrows indicate a path that keeps the point rather small and doesn't interfere with the critical neck to body joint. Of course, you can see the 3/4 roundover will take the edge off the figure point. The green arrows reference the edge path and 3/4 roundover needed to preserve the figure point, and cannot be done. Peter has drawn these in for your reference only. Even if there was enough wood to do the green path, the point would be considerably larger than your original request. One idea is to hand contour the roundover on the back near the point and then blend it back into the 3/4 roundover, much like we did on Tom's Heart Omega, but his has a 1/2 roundover on the heart, then a 3/4 on the edge. The front of the bass would have the standard 3/4 roundover. So, the choices are: 1. use the blue path and 3/4 roundover as in the sketch. 2. hand contour the roundover on the back only near the point 3. abandon figure point preservation and return to the "small point" regardless of where the figuring winds up. Let me know what you want to do. Carving the point on your bass will wait until we hear back from you, though the rest of the carving will proceed. | ||
| crgaston
Advanced Member Username: crgaston Post Number: 204 Registered: 11-2005 |
Thanks, Mica and Peter. Let's try the blue line, reserving the option to go smaller after seeing it. | ||
| mica
Moderator Username: mica Post Number: 3327 Registered: 6-2000 |
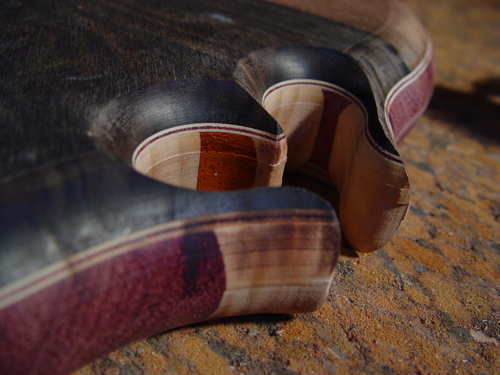
Check the new photos, let me know about the pointiness preference. | ||
| crgaston
Advanced Member Username: crgaston Post Number: 207 Registered: 11-2005 |
Good morning, Mica. Lets go smaller. What's there is cool, and Peter did a great job capturing that v-shape, (plus it'd be handy in a bar fight), but I think it will be great with the little vestigial point. Oh, and did I mention that the rest of the woodwork IS SO AMAZING THAT I ALMOST CAN'T STAND IT!!!!!! Wow. On that point close-up, the center laminates in the neck just seem to "Exist" in the middle of the body, like there's no separation between the neck and body; and the ebony accent lam is like a vein or reservoir of darkness flowing from the neck and percolating up through the maple as the spalting, permeating or infesting it with it's energy. Y'all got skills. I'll call you when I get home from work. |