| Author | Message | ||
| mica
Moderator Username: mica Post Number: 1022 Registered: 6-2000 |
Hey Randy! Here's those pictures we discussed last night. The neck with rough shaping: 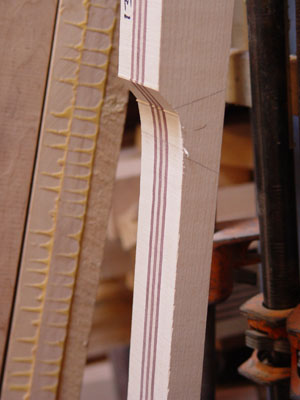 The body in the clamps: 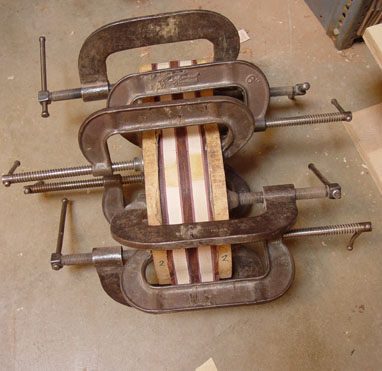 Of course you can't see how we got the top and back out of the same piece (#3120), but I'll show you some more photos next week. Should be routed on Thursday with the regular group. Final carving will be Friday and hopefully we'll get it in the spray run that afternoon. If not, the finish will start on Monday. After a few coats, I'll be able to give you a better estimate for the completion date. Please feel free to call or email with any questions and hope you have a good weekend. | ||
| mica
Moderator Username: mica Post Number: 1025 Registered: 6-2000 |
I knew I had a "parts" picture for you. Here's a shot before anything got glued up:  The template is in the picture too - you can see how it's shaped slightly different with the Omega tips. | ||
| randy
New Username: randy Post Number: 3 Registered: 1-2003 |
Thank you, Mica. | ||
| mica
Moderator Username: mica Post Number: 1043 Registered: 6-2000 |
Hey Randy, Here's the back view after thicknessing and ready for routing: 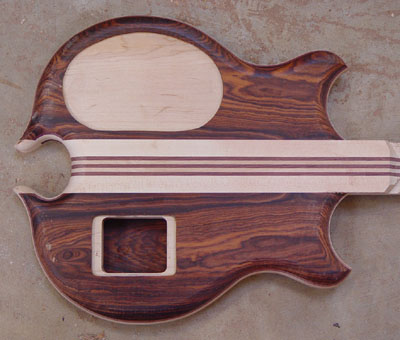 I'm still getting used to my new camera, the pictures of the front turned out awful, so I'll snpa off a couple more early next week. Anyway, I think it's looking great from any view. | ||
| randy
New Username: randy Post Number: 4 Registered: 1-2003 |
Thank you, Mica. I'm anxious to see more. | ||
| randy
New Username: randy Post Number: 5 Registered: 1-2003 |
Mica, I'm anxiously awaiting the other images of the body's front, neck front and back, and headstock front and back. I want to be certain that all is what I am expecting before it is too late for revisions, if necessary. I'll be on the lookout for your additional photos. Thank you. | ||
| mica
Moderator Username: mica Post Number: 1048 Registered: 6-2000 |
front and back in spray, after prepping for the next coat: 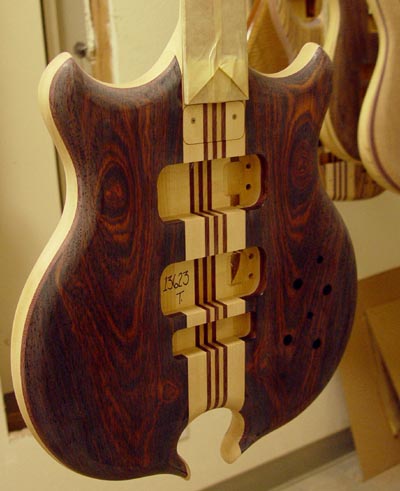 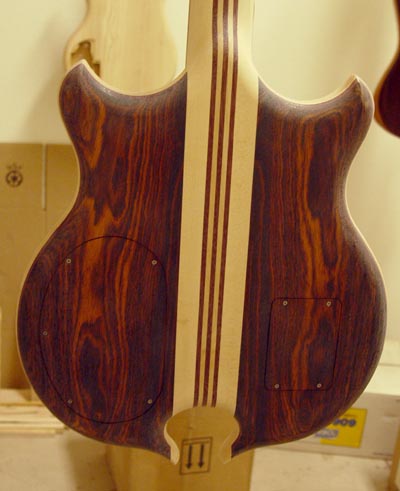 I'll snap some more and get the peghead front and back for you hopefully before Bob preps. You can see so much more when the paint is still shiny! | ||
| randy
New Username: randy Post Number: 6 Registered: 1-2003 |
Hi, Mica: It appears that the holes have already been drilled for the controls on the top of the body. In a previous message, I mentioned a specific layout I had in mind for the controls, and you answered there was plenty of time to discuss and design this. I assume it is too late - correct? Also, what is the status of the Dove inlay at the 12th fret? Again, it is my understanding that we would review this before the actual application. I look forward to your response, Randy | ||
| mica
Moderator Username: mica Post Number: 1050 Registered: 6-2000 |
Sorry for the oversight on the control layout, but as you can see, they are already drilled. If you require an alternate layout, you'll need to select another top and back for a new construction. Please let me know your thoughts on this. The dove inlay will be done very near the end of the process, when only 2-3 more coats of finish are needed. I discussed the inlay with James on Monday, and he agrees with me that in order to get a silver ouline around the dove we'll actually inlay the shell into a sterling silver sheet, then trim the sheet to leave a border around the dove, then inlay that into the fingerboard. Originally we were considering wrapping a silver wire around it, but we don't think that will come out as nicely. So even though you can't tell there are no inlays on the fingerboard under the tape, I can assure you the fingerboard is indeed blank. I will post a mock up of the artwork based on the design you sent to me and we can review the concept together before we actually do the inlay. I've also asked James to check with me before starting the inlay in case there are any last-minute changes. | ||
| randy
New Username: randy Post Number: 7 Registered: 1-2003 |
Mica, I've emailed you via regular channels. I await your reply. Randy | ||
| randy
New Username: randy Post Number: 8 Registered: 1-2003 |
Hi, Mica: Can you please tell me where each control goes in this configuration? And particularly, where does the LED on/off switch go? The output jack is sidemounted, correct? What type of control knobs will you use? Color and material? I'm anxious to see the Cocobolo on the peghead front and rear, when you have the opportunity to post the photos. I trust it was from the same piece as the body? Sounds great on the inlay. I'll wait to hear from you on that. Thanks for everything, Randy | ||
| mica
Moderator Username: mica Post Number: 1062 Registered: 6-2000 |
The control layout drilled is the standard Signature layout except for the side mounted jack: 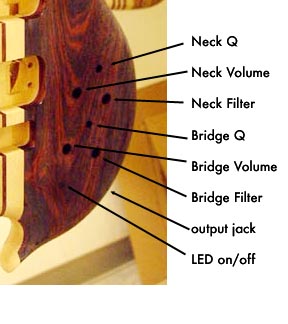 The hole for the LED switch is drilled in the setup room and its position is indicated on the picture, but it is not yet drilled. The knobs were not specificed on your order, so the normal black plastic collet knob would be used unless you tell me you want something else. I will take photos of the peghead tonight after the spray run, they are already prepped and not much to look at right now. | ||
| rogertvr
Member Username: rogertvr Post Number: 88 Registered: 1-2003 |
That is looking like one mighty fine instrument!! Can I ask a question please? Are the electronics on this bass standard signature electronics? Rog | ||
| randy
New Username: randy Post Number: 9 Registered: 1-2003 |
Hi, Rog: Yes, the electronics are Signature, with the addition of "Fat Boy" pickups. Thanks for your message, Randy | ||
| rogertvr
Member Username: rogertvr Post Number: 89 Registered: 1-2003 |
That layout there is interesting - in the Alembic catalogue I have here from 2000 (that Mica sent to me last year), the electronics layout is detailed as master volume and pan, two low-pass filters and two 2-position Q-switches. That's not what's written on that control layout picture above. As my Dragon's Wing is based on a Mark King Signature Deluxe, could someone or Mica please clarify what the electronics layout is for me please? Or have things changed since this catalogue was published? What were you expecting for controls Randy? Cheers, Rog | ||
| mica
Moderator Username: mica Post Number: 1063 Registered: 6-2000 |
The other thing different from the standard Signature electronics is the side mounted jack. Here's some peghead shots: 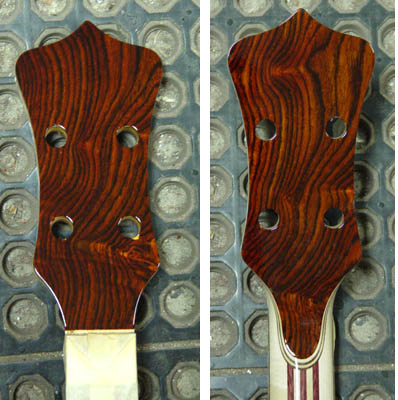 Not only are these from the same wood as the body, but these are lucky successive veneers. | ||
| randy
New Username: randy Post Number: 10 Registered: 1-2003 |
Hi, Rog: I only had an idea for a different arrangement of the controls on the body. Mica walked me through the pros and cons. The controls on this instrument are the correct ones; of that I am certain. As for your older catalog and the controls on your instrument, I'd refer you to the experts at Alembic for the correct answer. Thanks, Randy | ||
| valvil
Moderator Username: valvil Post Number: 159 Registered: 7-2002 |
Rog, The controls for a signature bass are similar to what is shown here on Randy's bass; the difference is that Randy's bass features one extra volume knob instead of the pan knob which is standard for signature electronics. So what is written on the catalogue Mica sent you is correct. Two tone filters, 2 Q switches, one pan, one volume. Unless you specifically asked for something different, that's what you're gonna get on your dragon bass. Valentino | ||
| rogertvr
Member Username: rogertvr Post Number: 90 Registered: 1-2003 |
Thanks for your replies. Two tone, 2 Q, one pan and one volume is exactly what I want on the Dragon. Cheers, Rog | ||
| mica
Moderator Username: mica Post Number: 1064 Registered: 6-2000 |
Wow, I can't believe I made such a bonehead mistake! The "Neck Volume" on that drawing is the "Master Volume" and the "Bridge Volume" is the "Pan" Of only I labelled as carfully as I drew lines, there would be less confusion. Sorry about that! | ||
| randy
Junior Username: randy Post Number: 11 Registered: 1-2003 |
Hi, Mica: Thank you for clarifying the controls' names. On the knobs, do you have a BLACK METAL version available? No special design, just rather simple, but metal rather than plastic. I prefer to understate the knobs, but prefer metal. I'd be happy to pay additional. The instrument is looking great. It is with great anticipation that I wait for a drawing and then photo of the Dove inlay. Thanks again, Randy | ||
| mica
Moderator Username: mica Post Number: 1074 Registered: 6-2000 |
We can purchase standard black metal dome knobs for your bass. The plastic knobs we use are quite expensive, so I don't believe there will be any additional charge. Here's the first round of the dove inlay idea:  The silver outline is meant to convey a sense of flight or motion. We tried with a constant outline width and it had the appearance of a stamp. The bass is ready for the inlay, so it can proceed as soon as we finalize the artwork decision. | ||
| mica
Moderator Username: mica Post Number: 1075 Registered: 6-2000 |
As you know, your fingerboard is Coco Bolo, the black background in the previous picture is just so you can clearly see the shape. | ||
| randy
Junior Username: randy Post Number: 12 Registered: 1-2003 |
Thank you, Mica, for this rendering of the inlay, but it's not what I'd like - sorry! The motion that needs to be depicted is DESCENDING. Your idea gives the impression of forward flight, and the dove itself is not "stylized" enough for my eye. I really prefer that we stick with the original design I sent to you dated 4-7-03, with the thin sterling silver line around just the dove itself, rather than the wide silver outline you have. Unless there is difficulty reproducing what I sent, I'd like it to be as close as possible to what I provided. I can re-send my idea if you do not have it. Also, the width of the 12th fret position is a little less than one inch (1") - am I correct? Accordingly, I assume my inlay would need to be approximately 3/4" or so in width, from the tip of the left wing to the tip of the beak, and about one inch (1") in height, from the tip of the right wing to the tip of the tail. Correct? And, the inlay would be oriented on the fingerboard so that the audience would see the dove in the "upright" position (and the player would see it upside-down.) Correct? Thank you for pointing out that the fingerboard is indeed Cocobolo. On the knobs, sight unseen, I would prefer the black metal ones, unless you think it would be a bad idea. Just let me know, and I can go either way. Thanks again, Mica. I look forward to the revised inlay. Randy | ||
| mica
Moderator Username: mica Post Number: 1079 Registered: 6-2000 |
Here's a new version of the original artwork you sent:  This image is oriented so the top edge is where the fingerboard LEDs are installed. We trimmed some of the raggy, more drawn-looking edges... they didn't translate well to the inlay medium. As far as the dimensions go, I'll have to verify those figures on Friday as tomorrow will find me at a trade show with my father. | ||
| randy
Junior Username: randy Post Number: 13 Registered: 1-2003 |
Thank you, Mica. This is PERFECT! And, assuming the vertical lines are the frets, I don't need for you to provide the exact dimensions. This rendering is great and shows it EXACTLY the way I envisioned it. Please express my appreciation to Susan for this. Thanks again, Randy | ||
| mica
Moderator Username: mica Post Number: 1091 Registered: 6-2000 |
Here's the design placed on your fingerboard and scaled properly: 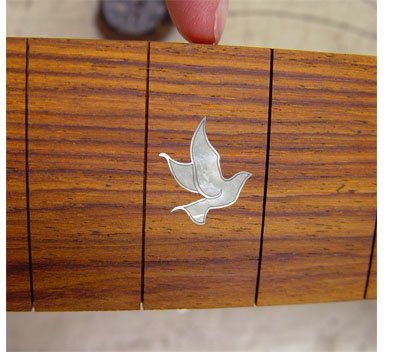 My finger is pointing to the edge with the LEDs. We're thinking that the dove should not be exactly centered, but slightly toward the LED edge. | ||
| randy
Junior Username: randy Post Number: 14 Registered: 1-2003 |
Thank you, Mica. This looks just great. Please proceed as we discussed. Thanks again, Randy | ||
| mica
Moderator Username: mica Post Number: 1119 Registered: 6-2000 |
Here it is "in the flesh" 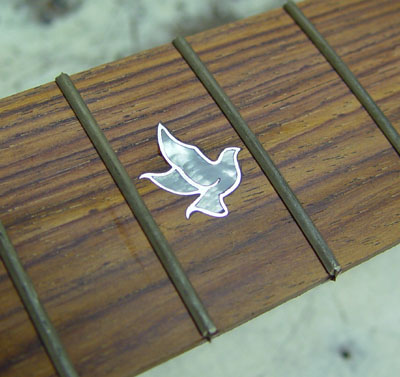 | ||
| rogertvr
Intermediate Member Username: rogertvr Post Number: 105 Registered: 1-2003 |
Nice!! :-) |